
How to build a WordPress image slider
Our last article about the Meteor slides plugin was about how to use the plugin for your WordPress website and doesn’t require any programming skills. My article today is about building a WordPress image slider from the ground up without using a plugin. Actually this is not totally true, because the tutorial is “only” about the WordPress part and we will be using a readymade slideshow plugin written in jQuery. I’m using the tutorial code for my own website as well, check the demo right below.

- Previous
- Next
WordPress image slider tutorial
Most image slider plugins are based on a third party slideshow plugin, written in jQuery or JavaScript. This is not surprising, because building a responsive and flexible slideshow is a different task than writing a few blocks of PHP code in WordPress. I’m going to show you how to use the same code most slider plugins use to integrate and control a slider function right in your WordPress blog post. I’m using Flexslider 2, a jQuery plugin maintained by WooThemes. WooThemes has built Flexslider 2 as the basis for their own premium WordPress themes and plugin. Reason enough to use their jQuery plugin for this WordPress tutorial.
Prepare your WordPress theme
All the tutorial code needs to be placed in your theme’s functions.php file, but before we can do that, we need to copy some files from the Flexslider jQuery plugin into the theme’s directory as well. Create a directory called flexslider in your themes directory. Download the Flexslider 2 plugin and upload the files flexslider.css and jquery.flexslider-min.js including the directories named fonts and images into the flexslider directory you just created.
The following two functions are used to include the necessary JavaScript and CSS code into your theme footer. I’m using a “special method” I’ve found on Scribu.net to include these files inside the footer to keep my theme files fast. Many plugin developers include JS/CSS files on every page, post or even archive pages. The function print_my_script() below will include the JS/CSS files only on those pages where the slider shortcode is actually used.
|
1
2
3
4
5
6
7
8
9
10
11
12
13
14
15
16
17
18
19
20
21
22
23
24
25
26
27
28
29
30
31
32
|
add_action(‘init’, ‘register_my_scripts’);
function register_my_scripts() {
wp_register_script( ‘flexslider’, get_stylesheet_directory_uri() . ‘/flexslider/jquery.flexslider-min.js’, array(‘jquery’), ‘1.0.0’, true );
}
add_action(‘wp_footer’, ‘print_my_script’, 99);
function print_my_script() {
global $add_my_script, $ss_atts;
if ( $add_my_script ) {
$speed = $ss_atts[‘slideshowspeed’]*1000;
echo “<script type=\“text/javascript\“>
jQuery(document).ready(function($) {
$(‘head’).prepend($(‘<link>’).attr({
rel: ‘stylesheet’,
type: ‘text/css’,
media: ‘screen’,
href: ‘” . get_stylesheet_directory_uri() . “/flexslider/flexslider.css’
}));
$(‘.flexslider’).flexslider({
animation: ‘”.$ss_atts[‘animation‘].”‘,
slideshowSpeed: “.$speed.”,
controlNav: false
});
});
</script>“;
wp_print_scripts(‘flexslider’);
} else {
return;
}
}
|
The first function registers the JavaScript file and the second function will output (print) all the other code, including the code for Flexslider 2, into the footer of your theme. Note the variable $add_my_scripts is used as a kind of filter. I will explain later how this filter works.
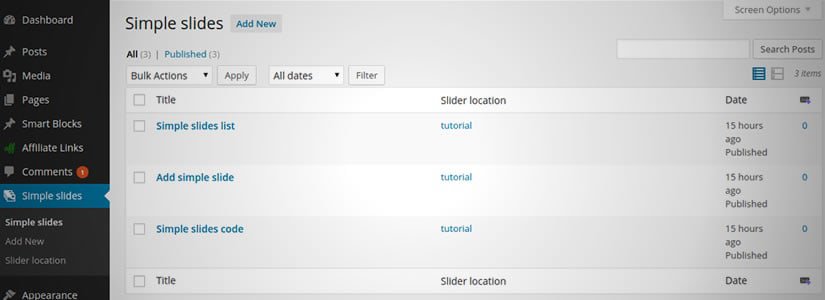
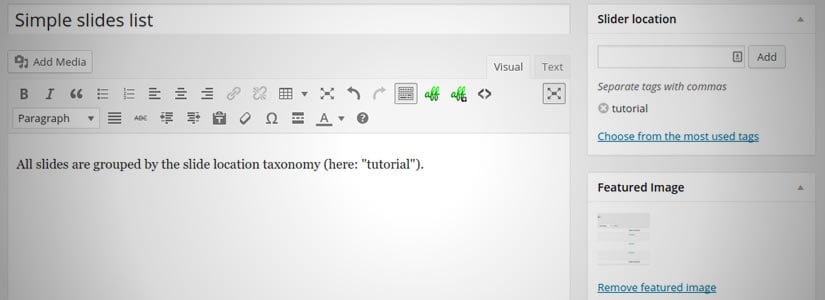
Custom post type and taxonomy
I created a custom post type for all the different sliders I will later create for my website. The custom taxonomy is used to bundle these slides (posts) into one or more slideshows.
|
1
2
3
4
5
6
7
8
9
10
11
12
13
14
15
16
17
18
19
20
21
22
23
24
25
26
27
28
|
add_action( ‘init’, ‘create_slider_posttype’ );
function create_slider_posttype() {
$args = array(
‘public’ => false,
‘show_ui’ => true,
‘menu_icon’ => ‘dashicons-images-alt’,
‘capability_type’ => ‘page’,
‘rewrite’ => array( ‘slider-loc’, ‘post_tag’ ),
‘label’ => ‘Simple slides’,
‘supports’ => array( ‘title’, ‘editor’, ‘custom-fields’, ‘thumbnail’, ‘page-attributes’)
);
register_post_type( ‘slider’, $args );
}
add_action( ‘init’, ‘create_slider_location_tax’ );
function create_slider_location_tax() {
register_taxonomy(
‘slider-loc’,
‘slider’,
array(
‘label’ => ‘Slider location’,
‘public’ => false,
‘show_ui’ => true,
‘show_admin_column’ => true,
‘rewrite’ => false
)
);
}
|
For the custom post type I use the set public to false to keep the slider posts out of the results from any search engine. I do the same for the custom taxonomy named slide-loc. For the post type, I have enabled only the fields I really need. That includes the custom field, which I use for the target URL behind each slide.
The following small function is responsible for creating a post meta value for each slide. This value is used as a default URL value for the custom field.
|
1
2
3
4
5
6
|
add_action(‘wp_insert_post’, ‘set_default_slidermeta’);
function set_default_slidermeta($post_ID){
add_post_meta($post_ID, ‘slider-url’, ‘http://’, true);
return $post_ID;
}
|
WordPress image slider shortcode
The last part of code is used to show your slideshow inside a post, page, theme or any other place where the usage of a shortcode is possible.
|
1
2
3
4
5
6
7
8
9
10
11
12
13
14
15
16
17
18
19
20
21
22
23
24
25
26
27
28
29
30
31
32
33
34
35
36
37
38
39
40
41
42
43
44
45
46
47
48
49
50
51
52
53
|
add_shortcode( ‘simpleslider’, ‘simple_slider_shortcode’ );
function simple_slider_shortcode($atts = null) {
global $add_my_script, $ss_atts;
$add_my_script = true;
$ss_atts = shortcode_atts(
array(
‘location’ => ”,
‘limit’ => –1,
‘ulid’ => ‘flexid’,
‘animation’ => ‘slide’,
‘slideshowspeed’ => 5
), $atts, ‘simpleslider’
);
$args = array(
‘post_type’ => ‘slider’,
‘posts_per_page’ => $ss_atts[‘limit’],
‘orderby’ => ‘menu_order’,
‘order’ => ‘ASC’
);
if ($ss_atts[‘location’] != ”) {
$args[‘tax_query’] = array(
array( ‘taxonomy’ => ‘slider-loc’, ‘field’ => ‘slug’, ‘terms’ => $ss_atts[‘location’] )
);
}
$the_query = new WP_Query( $args );
$slides = array();
if ( $the_query->have_posts() ) {
while ( $the_query->have_posts() ) {
$the_query->the_post();
$imghtml = get_the_post_thumbnail(get_the_ID(), ‘full’);
$url = get_post_meta(get_the_ID(), ‘slider-url’, true);
if ($url != ” && $url != ‘http://’) {
$imghtml = ‘<a href=”‘.$url.‘”>’.$imghtml.‘</a>’;
}
$slides[] = ‘
<li>
<div class=”slide-media”>’.$imghtml.‘</div>
<div class=”slide-content”>
<h3 class=”slide-title”>’.get_the_title().‘</h3>
<div class=”slide-text”>’.get_the_content().‘</div>
</div>
</li>’;
}
}
wp_reset_query();
return ‘
<div class=”flexslider” id=”‘.$ss_atts[‘ulid’].‘”>
<ul class=”slides”>
‘.implode(”, $slides).‘
</ul>
</div>’;
}
|
This shortcode accepts 3 attributes: a slider location, the animation type and the slideshow speed. These values are passed to the database query or the JavaScript snippet. Do you remember the variable $add_my_script I’ve mentioned before? This “global” variable is set right in the shortcode function and takes care about that all Flexslider files are only included on pages or posts where the slideshow shortcode is used! All HTML code for the slideshow is created by this function.
Using the slideshow shortcode and final words
This tutorial is not written for the WordPress beginner, but I’m also sure it’s not too complicated. Just insert a few slides via the new custom post type you have created. Add also a location (custom taxonomy) if needed. Now you can use the three attributes to configure your slideshow a bit, for example the shortcode would be:
|
1
|
[simpleslider location=”homepage” animation=”slide” slideshowspeed=”5″]
|
This shortcode will show all slides with custom taxonomy “homepage” (the slug) and show them in animation mode “slide” (you can also use “fade”) and the speed is set to 5 seconds. The attributes are not required and if you like to have more options you can add them to the function with the name print_my_spript(). This page shows all available Flexslider 2 properties.
The tutorial code doesn’t have some special style for the slideshow. If you like to use the same style as I used for my demo, copy/paste this CSS code into your theme’s stylesheet.
